TL;DR:
- Epoxy coatings are durable, moisture-resistant solutions suited for heritage home surfaces.
- Proper preparation, including moisture testing and surface repair, is essential for lasting results.
- They enhance floor longevity and value while respecting the character of Victorian and Edwardian homes.
Victorian and Edwardian homes across Melbourne’s inner suburbs carry a quality of character that newer builds simply cannot replicate. But their floors, verandas, and entrance halls often bear the full weight of that history, showing cracks, staining, and surfaces that traditional coatings struggle to protect. Many homeowners find that standard paints and sealers fade, peel, or fail to bond properly to older substrates, leaving surfaces looking worse than before. Epoxy coatings offer a modern solution that respects the integrity of period properties while delivering genuine durability. This guide walks you through everything you need to know: what epoxy is, how to prepare your home, how to apply it correctly, and how to keep it looking refined for years to come.
Table of Contents
- Understanding epoxy coatings for heritage homes
- What you need: Materials, tools, and planning
- Step-by-step application for period home floors
- Troubleshooting, maintenance, and lasting results
- What most epoxy guides get wrong about period home floors
- Take your heritage renovation further with Sol Shine
- Frequently asked questions
Key Takeaways
| Point | Details |
|---|---|
| Epoxy suits period homes | Epoxy coatings can protect and revitalise Melbourne’s Victorian and Edwardian floors when properly applied. |
| Preparation is essential | Thorough cleaning and careful planning are key to epoxy coating success in older properties. |
| Maintenance preserves results | Regular cleaning and prompt attention to any issues keep epoxy floors looking stunning for decades. |
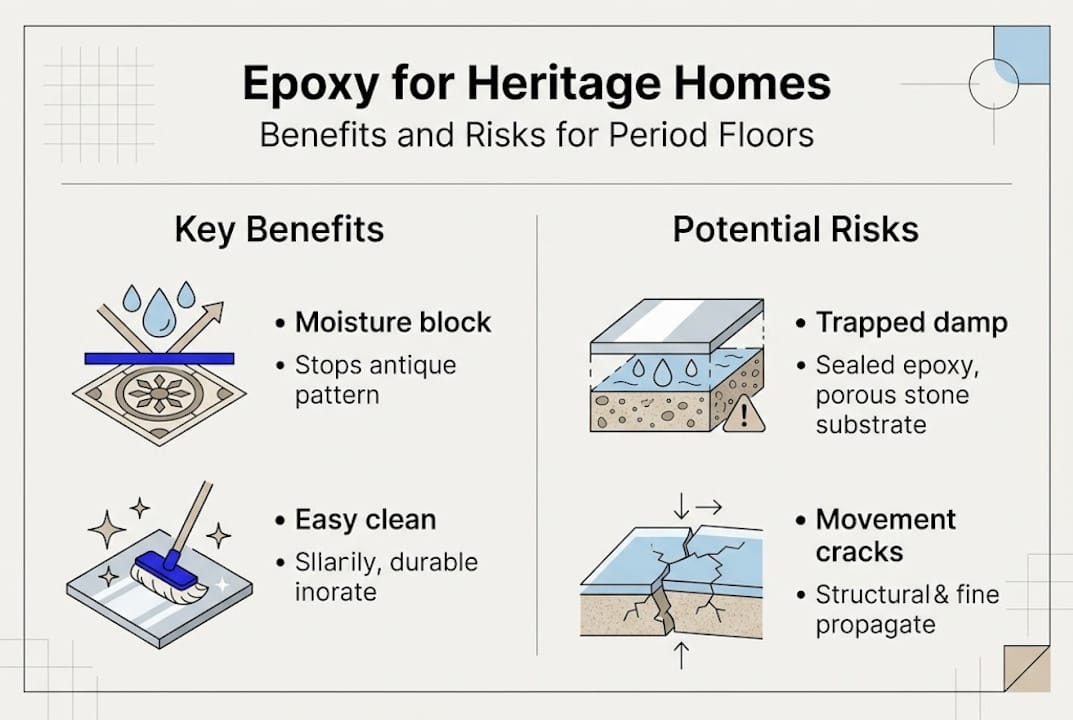
| Heritage details need care | Epoxy can enhance but also conceal features, so always test and plan around original architectural details. |
Understanding epoxy coatings for heritage homes
Epoxy coatings are two-part systems combining a resin and a hardener that, when mixed, form an exceptionally strong, chemically bonded surface layer. Unlike standard floor paints that sit on top of a surface, epoxy penetrates and bonds directly to the substrate. This makes it particularly well-suited to the older concrete, timber, and rendered surfaces found in Victorian and Edwardian homes across suburbs like Kew, Hawthorn, and Brighton.
The epoxy benefits for heritage homes extend well beyond aesthetics. Epoxy resists moisture ingress, which is a genuine concern in period properties where rising damp and seasonal movement are common. It is also highly resistant to abrasion, meaning high-traffic entrance halls and verandas hold up far better than they would under a conventional coating. Maintenance is straightforward: a damp mop and a mild cleaner are usually all that is required.
When comparing epoxy to traditional finishes, the differences are significant:
| Feature | Epoxy coating | Traditional paint/sealer |
|---|---|---|
| Bond strength | Chemically bonded | Surface adhesion only |
| Moisture resistance | High | Low to moderate |
| Lifespan | 10 to 20 years | 3 to 7 years |
| Maintenance | Minimal | Regular recoating needed |
| Suitability for old substrates | Excellent with prep | Variable |
Common areas in period homes where epoxy performs exceptionally well include:
- Entrance halls and foyers with original tessellated or concrete floors
- Rear verandas and outdoor entertaining areas
- Period kitchens undergoing partial or full renovation
- Garage floors and laundry areas in heritage properties
- Basement or cellar floors prone to moisture
A common misconception is that epoxy looks industrial or out of place in a heritage setting. In practice, modern epoxy formulations are available in a wide range of finishes, from satin to low-sheen, and can be tinted to complement original period palettes. Superior durability and resistance make epoxy a practical choice for floors that need to last. Equally, epoxy coatings preserve floor surfaces while contributing to the overall property value of a well-maintained heritage home.
What you need: Materials, tools, and planning
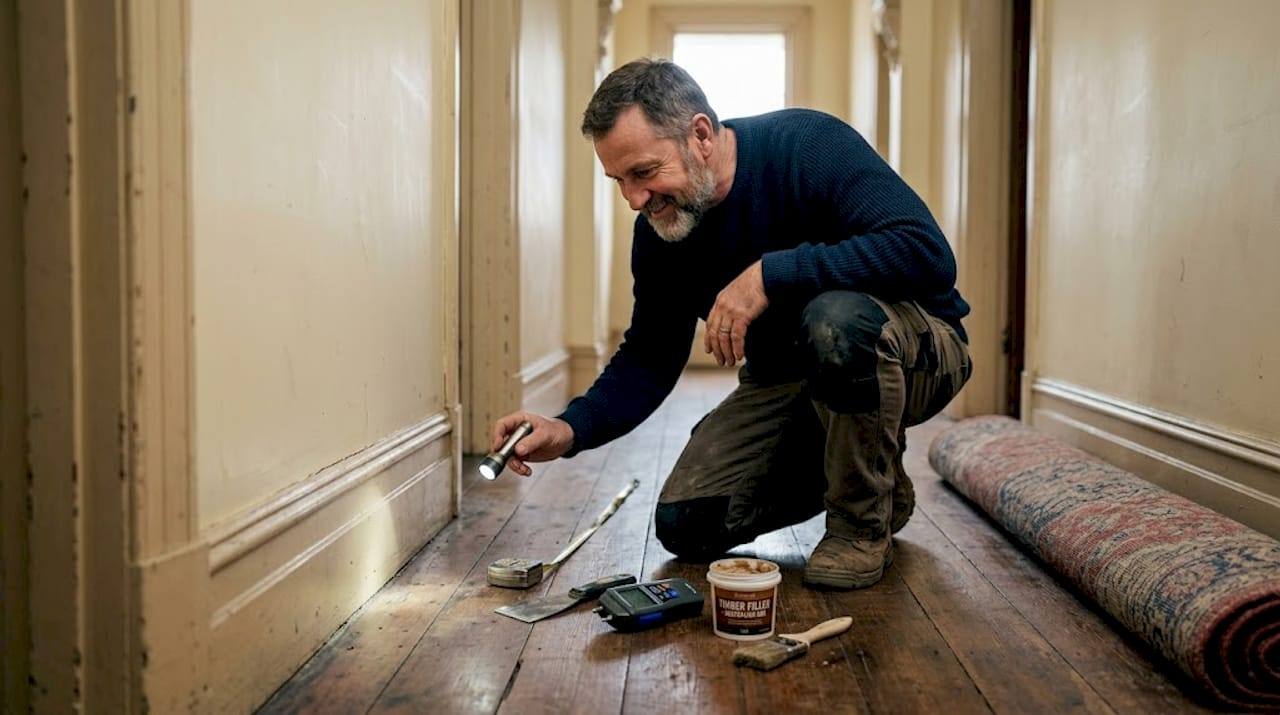
Proper preparation is where most epoxy projects succeed or fail. Preparation is crucial for epoxy longevity, and skipping steps at this stage is the most common reason for premature peeling or bubbling. Before you purchase a single tin of epoxy, a thorough inspection of your floors is essential.
Start by checking for moisture. In older Melbourne homes, particularly those built before 1940, concrete slabs and timber subfloors can retain significant moisture. A simple plastic sheet test, taped flat to the floor for 24 hours, will reveal whether moisture is present. Any reading above acceptable thresholds means the substrate needs treatment before coating proceeds.
Also inspect for cracks, staining from old adhesives, and the presence of lead paint in previously coated areas. Heritage homes built before 1970 frequently contain lead-based coatings, and disturbing these without proper precautions creates a genuine health risk. Consulting a professional before grinding or sanding is strongly advised. For homes with original windows and timber detailing, reviewing heritage window repair steps before beginning floor work ensures the full scope of restoration is considered.
Here is a practical materials and tools reference for a standard epoxy project:
| Item | Typical quantity (per 20 sqm) | Notes |
|---|---|---|
| Epoxy primer | 2 to 4 litres | Moisture-tolerant formula preferred |
| Epoxy base coat | 4 to 6 litres | Two-part system |
| Top coat (optional) | 2 litres | Adds UV and scratch resistance |
| Diamond grinder or sander | Hire or professional | Essential for adhesion |
| Roller frames and sleeves | 3 to 4 | Short nap, solvent-resistant |
| Mixing paddle and drill | 1 | Consistent mixing is critical |
| Painter’s tape and plastic sheeting | As needed | Protects skirtings and tiles |
Key planning considerations include:
- Temperature and humidity: Apply epoxy between 10°C and 25°C with low humidity for best results
- Ventilation: Open windows and use fans; epoxy fumes require adequate airflow
- Timing: Allow at least 48 hours of clear weather for outdoor or semi-outdoor areas
- Protecting original features: Mask off original tessellated tiles, skirtings, and decorative borders carefully
Pro Tip: Before committing to a full floor, apply a small test batch in a cupboard or under a removable rug. This reveals how the epoxy bonds to your specific substrate and how the finish looks against your period interior.
Step-by-step application for period home floors
With your tools assembled and your surface inspected, the application process can begin. Rushing this stage is the single biggest mistake homeowners make, particularly in older properties where surfaces are rarely perfectly uniform.
Step 1: Surface preparation. Grind or sand the floor to open the substrate and remove any existing coatings, adhesives, or contamination. For heritage concrete or rendered floors, a diamond grinder provides the most consistent result. Vacuum thoroughly and wipe down with a damp cloth. Allow to dry completely.
Step 2: Crack and hole repair. Fill any cracks or voids with an epoxy filler compound. Feather edges smoothly so the repair blends with the surrounding surface. Allow the filler to cure fully before proceeding.
Step 3: Apply the primer coat. Mix the primer according to the manufacturer’s ratio, typically 2:1 resin to hardener. Apply with a roller in even, overlapping strokes. Work from the far corner toward the exit. Allow to cure for the recommended time, usually 8 to 12 hours.
Step 4: Apply the main epoxy coat. Mix the base coat thoroughly for at least three minutes using a paddle mixer. Apply in thin, even passes. Avoid overworking the roller, which introduces air bubbles. A stepwise application technique ensures a smooth, professional result across the full floor area.
Step 5: Apply the top coat (optional but recommended). A clear top coat adds UV resistance and scratch protection, which is particularly valuable in period homes where natural light through original windows can be intense.
Pro Tip: To avoid roller lines, use a cross-hatch rolling pattern and maintain a wet edge throughout. Thin coats applied twice always outperform one thick coat.
Protect skirtings, original tile borders, and decorative thresholds with quality painter’s tape and plastic sheeting before each coat. Always follow painting safety standards when working in enclosed heritage spaces, particularly where older coatings may be present.
“The difference between an adequate epoxy job and an exceptional one almost always comes down to preparation and patience, not the product itself.”
Troubleshooting, maintenance, and lasting results
Even with careful application, issues can emerge, particularly in period homes where substrates are unpredictable. Knowing what to look for early makes the difference between a minor fix and a full recoat.
Common problems and their causes:
- Bubbling or pinholes: Usually caused by moisture in the substrate or applying epoxy in high humidity
- Yellowing: Exposure to UV light; a UV-resistant top coat prevents this
- Peeling or delamination: Poor surface preparation or insufficient primer adhesion
- Cloudy or milky finish: Moisture contamination during application
- Poor adhesion at edges: Inadequate masking removal timing or surface contamination near skirtings
Proper care extends floor life significantly, and a simple routine goes a long way. Sweep or vacuum weekly to remove grit that can scratch the surface. Mop with a pH-neutral cleaner monthly. Avoid harsh chemicals, abrasive pads, or steam mops, which can degrade the coating over time.
For period homes, typical issues in heritage properties include movement cracks reappearing through the coating as the building settles seasonally. These are best addressed with a flexible epoxy filler rather than a rigid patch.
| Condition | Well-maintained epoxy | Neglected epoxy |
|---|---|---|
| Appearance after 5 years | Glossy, even, clean | Dull, stained, patchy |
| Adhesion integrity | Fully intact | Peeling at edges |
| Repair required | Minor touch-ups only | Likely full recoat |
| Property presentation | Enhances heritage character | Detracts from period appeal |
Knowing when to call a professional matters. If delamination covers more than 20% of the floor, or if moisture-related failure is suspected, a professional assessment will save time and money compared to repeated DIY attempts.
What most epoxy guides get wrong about period home floors
Most epoxy guides treat all floors as equivalent, which is a significant oversight when you are working in a home built in 1895 or 1910. The substrates in Victorian and Edwardian properties are not uniform. You may encounter original bluestone, compressed earth, early concrete mixes with inconsistent aggregate, or timber subfloors that have been overlaid multiple times across a century.
The biggest mistake Sol Shine sees on heritage projects is skipping lead and asbestos testing before any grinding or sanding begins. This is not a minor procedural step. It is a legal and safety obligation in Victoria, and the consequences of ignoring it are serious.
The second most common error is treating movement cracks as a cosmetic issue. Period homes move. They always have. A rigid epoxy applied over an active crack will simply crack again. Understanding the true epoxy benefits means choosing flexible formulations where the substrate demands it, not defaulting to the most affordable product on the shelf.
Blending a modern coating with original detailing requires restraint and skill. The goal is always to enhance the period character, not overpower it.
Take your heritage renovation further with Sol Shine
If you are ready to move forward with epoxy coating or a broader restoration of your Victorian or Edwardian home, Sol Shine brings the expertise to do it properly.

Sol Shine’s team of skilled painters and heritage restoration specialists services Melbourne’s inner east, bayside, and surrounding suburbs, handling everything from epoxy floor preparation to full façade restoration under one roof. Whether you need guidance on heritage painting services, are planning an interior painting refresh, or simply want to review painting maintenance tips before your next project, Sol Shine is ready to help. Contact us to arrange a consultation and protect the character of your period home with confidence.
Frequently asked questions
Can epoxy coatings be applied over old, uneven floors in Victorian homes?
Yes, but floors must be cleaned, repaired, and often levelled first to ensure proper adhesion and longevity. Preparation and repair are essential steps before any epoxy is applied to an older substrate.
How long does epoxy last on period home floors?
With proper installation and maintenance, epoxy can last 10 to 20 years in heritage settings. Epoxy’s lasting durability makes it one of the most cost-effective long-term flooring solutions for period properties.
Are epoxy coatings safe for homes with children and pets?
Once fully cured and ventilated, epoxy floors are safe and straightforward to clean. Keep children and pets away during application and curing, as proper ventilation eliminates safety risks once the process is complete.
Will epoxy damage or cover up original Victorian tiles or features?
Carefully applied epoxy can enhance a floor, but it may conceal original details if applied broadly. Protecting period features during coating is essential, so always test a small area or consult a heritage specialist before proceeding.


