TL;DR:
- The right painting tools, from surface preparation to heritage-specific equipment, ensure long-lasting, professional results. Quality brushes, rollers, and safety gear significantly improve finish quality and efficiency. Proper preparation, including specialist heritage tools, is more influential than application tools in achieving durable, beautiful surfaces.
The must-have tools for home painting are the equipment that separates a patchy, time-consuming job from a clean, professional result. Whether you are repainting a Federation-era weatherboard in Hawthorn or refreshing the interior walls of a Camberwell terrace, the right home painting equipment determines finish quality, efficiency, and the long-term preservation of your surfaces. This guide covers every category of tool you need, from surface preparation through to final coat, with specific guidance for homeowners working on heritage properties where the stakes are higher and the margins for error are smaller.
1. Must-have tools for home painting: surface preparation
Surface preparation is the foundation of every successful paint job. A comprehensive DIY painting kit includes spackle, a putty knife, a paint scraper, sanding tools, painter’s tape, plastic sheeting, gloves, primer, brushes, rollers, paint trays, drop cloths, stir sticks, and ladders or extension poles. That list covers the full arc from raw wall to finished coat, and skipping any item creates problems downstream.
For surface preparation specifically, you need:
- Spackle and putty knife for filling cracks, nail holes, and minor surface damage before priming
- Paint scrapers in multiple widths (50mm and 100mm) for removing loose or flaking paint from walls and timber
- Sanding blocks and sandpaper in 80, 120, and 180 grit for smoothing filled areas and scuffing glossy surfaces
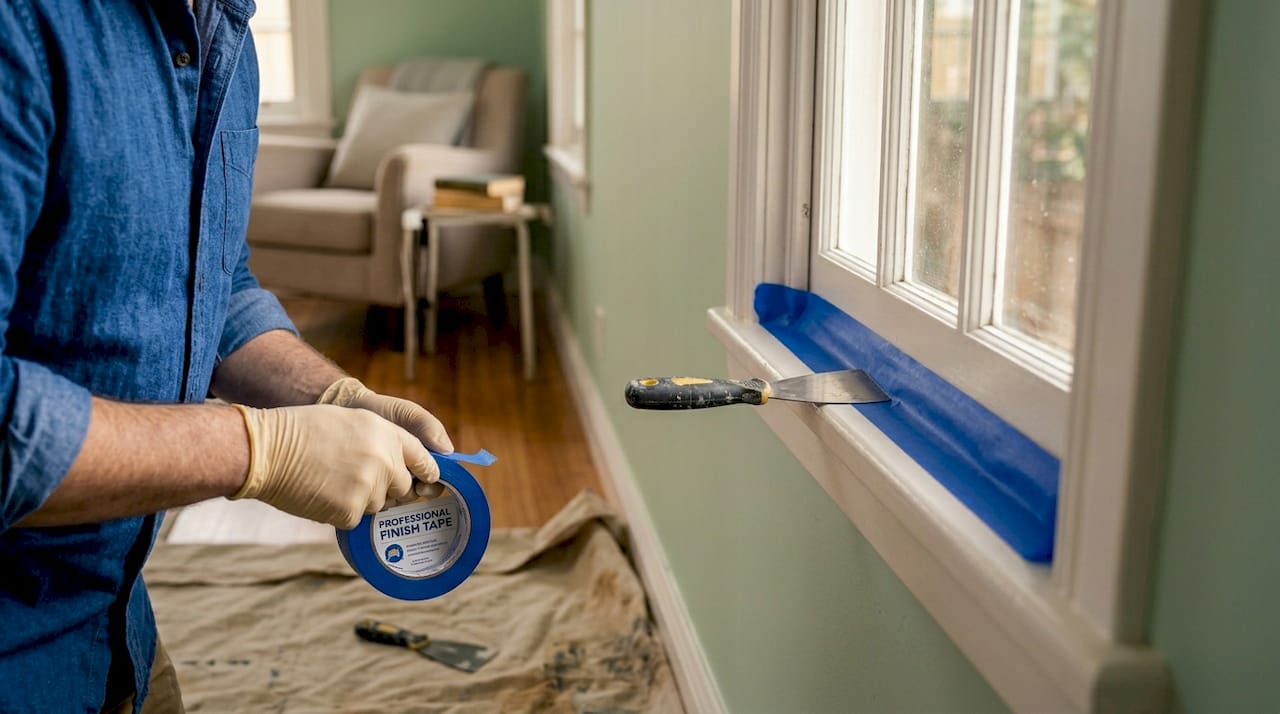
- Painter’s tape (Scotch Blue 2090 or equivalent) for masking skirting boards, cornices, and window frames
- Cleaning supplies including sugar soap, sponges, and a bucket for degreasing walls before painting
Pro Tip: Apply painter’s tape to a clean, dry surface and press the edge firmly with a putty knife. This prevents paint bleeding under the tape and gives you a sharper line on cornices and architraves.
Protection is equally non-negotiable. Canvas drop cloths on floors provide better footing and drip absorption than plastic sheeting, which becomes slippery underfoot. Plastic sheeting is better suited for covering furniture and objects. Professional painters follow the rule of “canvas on the floor, plastic on everything else” as a safety and quality standard. This layered approach saves significant cleanup time by preventing paint migration at edges and overlaps.
2. Choosing the right brushes and rollers
Tool choice dramatically influences paint finish. Quality brushes and rollers save time, materials, and yield results that budget alternatives simply cannot match. The key is matching the tool to the surface and the paint type.
Brushes:
- Angled sash brushes (50mm to 65mm) are the correct choice for cutting in at ceilings, cornices, and around window frames. The angled bristle profile gives you control on straight lines.
- Flat brushes (75mm to 100mm) suit panel doors, flat timber surfaces, and broad trim work.
- Synthetic bristles are the standard for water-based acrylic paints, which account for the majority of interior and exterior residential work in Australia. Natural bristle brushes suit oil-based paints and deliver a smoother finish on heritage timber joinery.
Rollers:
Match roller cover nap length to wall texture for best coverage. Nap length controls coverage and finish quality: use 6mm to 10mm nap for smooth surfaces, 10mm to 13mm for standard interior walls, and 19mm to 32mm for rough or heavily textured surfaces. Using the wrong nap on a smooth wall leaves stippling; using a short nap on rough render leaves bare patches.
| Surface type | Recommended nap | Best use case |
|---|---|---|
| Smooth plaster or plasterboard | 6mm to 10mm | Feature walls, ceilings |
| Standard interior walls | 10mm to 13mm | Living rooms, bedrooms |
| Rough render or textured surfaces | 19mm to 32mm | Exterior masonry, feature render |
| Heritage timber weatherboards | Short nap or brush only | Detailed exterior timber |
Synthetic roller covers dominate modern painting jobs because they resist swelling and provide even paint release. Natural fibre covers are reserved for specialist oil-based applications. For most homeowners working with Dulux or Taubmans water-based products, a quality synthetic cover is the correct choice.
Pro Tip: Load a roller by running it through the paint tray well, then rolling it up the ribbed section four or five times before applying it to the wall. This distributes paint evenly through the nap and prevents heavy drips on the first stroke.
3. Cut buckets and paint trays for edge control
A cut bucket with a built-in magnet paired with an angled brush greatly improves cutting-in precision and brush management. The magnet holds the brush against the side of the bucket between strokes, preventing drips on the floor and keeping the bristles loaded correctly. This is a small tool that makes a measurable difference on long cutting-in sessions around cornices and window reveals.
Paint trays with disposable liners are the standard setup for roller work. The liner system means you can swap colours without washing the tray, which saves time on multi-room projects. For larger jobs, a 9-litre roller bucket with a roller grid is more efficient than a standard tray because it holds more paint and reduces the frequency of reloading.
4. Extension poles and ladders for reach and safety
Extension poles threaded onto roller frames allow you to reach high ceilings and tall walls efficiently, reducing the number of ladder moves required and improving consistency across large surfaces. Telescoping poles that extend from 1.2 metres to 2.4 metres cover most residential ceiling heights without requiring a ladder at all for roller work.
For cutting in at height, a solid aluminium platform ladder (1.2 metres to 1.8 metres) is safer and more stable than a stepladder. Homeowners working on double-storey Victorian or Edwardian homes in suburbs like Kew or Malvern should consider a scaffold platform for exterior work above the ground floor. The investment in proper access equipment pays for itself in both safety and finish consistency.
A multi-use painter’s tool is another piece of home painting equipment worth having on every job. A quality 5-in-1 or 6-in-1 painter’s tool functions as a scraper, putty spreader, roller cleaner, paint tin opener, and nail set. It reduces the number of individual tools you need to carry and keeps your work area organised.
5. Vacuum scrapers for dust control during prep
Vacuum-attached paint scrapers reduce debris and airborne dust significantly during paint and varnish removal, improving cleanliness and safety. Tools like the ProScraper connect directly to a domestic vacuum cleaner and capture paint chips and dust at the source rather than allowing them to settle across the room. This matters most in older homes where lead paint may be present in layers beneath more recent coats.
For homeowners in Melbourne’s inner east working on pre-1970s properties, dust control during scraping is not just a cleanliness issue. It is a health and safety consideration. Vacuum-adapted scrapers reduce airborne particles and improve the indoor work environment, making them a worthwhile addition to your essential painting supplies for any heritage property.
6. Specialist tools for painting and preserving historic woodwork
Heritage timber requires a different approach to paint removal and surface preparation. Historic wood paint removal should start with testing and use gentle heat to soften paint, then scrape carefully. Aggressive sanding damages the wood grain permanently, which destroys the fine detail on Victorian architraves, Edwardian window reveals, and heritage skirting boards.
The correct toolkit for heritage timber work includes:
- Low-temperature heat gun (set below 230°C) to soften paint without scorching the timber beneath
- Chemical strippers such as Peel Away or Citristrip for intricate mouldings where a scraper cannot reach without gouging
- Profile scrapers shaped to match the specific moulding profile, available from specialist timber restoration suppliers
- Fine-grit sanding sponges (180 to 220 grit) for final smoothing without removing material from carved or turned details
“Preservation-focused painting stresses gentle, test-first methods to protect historic wood surfaces while repainting or stripping paint layers.” The test-first principle means applying heat or chemical stripper to a small, inconspicuous area before committing to the full surface. This reveals how the timber responds and prevents irreversible damage to irreplaceable joinery.
For heritage home interior prep, the brush selection matters as much as the stripping method. Use a quality natural bristle brush with oil-based primer on bare heritage timber to penetrate the grain and seal the surface before applying a water-based topcoat. This two-system approach delivers adhesion and durability without sacrificing the timber’s natural character.
7. Organising your complete painting toolkit by project type
The top painting tools you need vary by project type, surface, and whether heritage preservation is a factor. The table below summarises the core toolkit for three common residential scenarios.
| Project type | Core tools required | Heritage consideration |
|---|---|---|
| Interior walls and ceilings | Roller, tray, angled brush, painter’s tape, drop cloths, extension pole | Low, unless original plaster cornices present |
| Exterior weatherboard | Scraper, sanding block, angled brush, extension pole, scaffold | High. Gentle prep to preserve timber profile |
| Heritage timber trim and joinery | Heat gun, profile scraper, natural bristle brush, chemical stripper | Critical. Test before stripping, no aggressive sanding |
For multi-day projects, layered protection saves significant rework time. Canvas drop cloths combined with plastic sheeting on furniture, careful taping, and sealed doorways prevent paint migration and keep adjacent rooms clean. Roll the canvas cloth back at the end of each day rather than leaving it bunched, which creates trip hazards and uneven surfaces underfoot.
Pro Tip: Store brushes overnight by wrapping them tightly in plastic wrap rather than washing them between coats. This keeps the bristles soft and paint-loaded for the next session, saving both time and water.
Budget-conscious homeowners can build a capable kit with mid-range tools from Bunnings Warehouse (Monarch or Purdy brushes, Wooster rollers) without compromising finish quality. Premium tools from brands like Purdy or Corona last significantly longer and maintain their shape through multiple projects, making them the better value over time for anyone planning more than one or two painting jobs.
For surfaces that need to last, the preparation tools matter as much as the application tools. A well-prepared surface holds paint for a decade or more; a poorly prepared one begins to peel within two to three years regardless of how good the topcoat is.
Key takeaways
The right combination of preparation tools, quality brushes and rollers, and specialist heritage equipment determines whether a home painting project delivers a lasting, professional result or requires costly rework within a few years.
| Point | Details |
|---|---|
| Surface prep tools are non-negotiable | Spackle, scrapers, sanding blocks, and painter’s tape form the foundation of any quality paint job. |
| Match roller nap to surface texture | Use 6mm to 10mm nap for smooth walls and 19mm to 32mm for rough render or masonry. |
| Canvas on floors, plastic on furniture | Canvas drop cloths prevent slips and absorb drips; plastic sheeting protects furniture and objects. |
| Heritage timber needs gentle tools | Low-temperature heat guns and profile scrapers preserve wood grain that aggressive sanding destroys. |
| Cut buckets improve edge precision | A cut bucket with a built-in magnet reduces drips and speeds up cutting-in on cornices and reveals. |
What 15 years on heritage homes has taught me about painting tools
Most homeowners underestimate how much the tool quality affects the final result. They spend thousands on premium paint and then apply it with a cheap synthetic brush that leaves drag marks in the finish. The paint is only as good as the tool delivering it to the surface.
The insight that changed how I approach every heritage job is this: preparation tools matter more than application tools. A perfectly prepared surface painted with a mid-range brush looks better than a poorly prepared surface painted with the finest brush money can buy. On Victorian and Edwardian homes in suburbs like Hawthorn and Camberwell, where the original plaster cornices and timber joinery are irreplaceable, the heat gun and the profile scraper are the most important tools on the truck, not the brush.
The other thing I have seen consistently is that homeowners skip the cut bucket. They pour paint into a tray and try to cut in with a fully loaded brush, which drips constantly and makes the job twice as hard. A simple cut bucket with a magnet changes the entire experience of cutting in. It is one of those tools that costs very little and delivers disproportionate results.
My honest recommendation: invest in two or three quality angled sash brushes, a set of good rollers matched to your surface, a proper cut bucket, and a low-temperature heat gun if you have any heritage timber on the property. Those four items cover the majority of what separates a professional result from an amateur one.
— Jarrad
How Sol Shine delivers professional results on every project

Sol Shine brings the full toolkit, the right materials, and 15 years of heritage restoration experience to every project across Melbourne’s inner east and bayside suburbs. Whether you are planning an interior repaint in a Kew terrace or a complete façade restoration on an Edwardian home in Brighton, Sol Shine handles preparation, application, and finishing to a standard that lasts. The team works directly with homeowners on projects from $20,000 upward, covering everything from heritage timber joinery and render repair through to exterior weatherboard painting and roof coatings. Explore Sol Shine’s heritage painting services to see how the right tools and methods protect the character of your home for decades to come.
FAQ
What tools do I need to paint a room at home?
A complete room painting kit includes spackle, a putty knife, a paint scraper, sanding tools, painter’s tape, plastic sheeting, gloves, primer, brushes, rollers, paint trays, drop cloths, stir sticks, and an extension pole or ladder.
What roller nap should I use for interior walls?
Use a 10mm to 13mm nap roller for standard interior walls. Smooth plaster or plasterboard suits a 6mm to 10mm nap, while rough or textured surfaces require a 19mm to 32mm nap for adequate coverage.
Are canvas drop cloths better than plastic sheeting on floors?
Canvas drop cloths are the correct choice for floors because they provide better footing and absorb drips. Plastic sheeting becomes slippery underfoot and is better suited for covering furniture and objects.
What tools are needed to paint heritage timber without damaging it?
Use a low-temperature heat gun set below 230°C, chemical strippers for intricate mouldings, profile scrapers matched to the moulding shape, and fine-grit sanding sponges. Avoid aggressive sanding, which permanently damages the wood grain on Victorian and Edwardian joinery.
Is a cut bucket worth buying for DIY painting?
A cut bucket with a built-in magnet is one of the most practical tools for cutting in at cornices and window frames. It holds the brush between strokes, prevents drips, and significantly improves edge precision compared to working from a standard paint tray.


