TL;DR:
- Proper wall preparation in heritage homes requires gentle cleaning, flexible filling, and breathable primers.
- Ignoring steps like cleaning or priming can lead to poor adhesion and premature paint failure.
- Professional support ensures preservation of original features and long-lasting, quality finishes.
Expert guide to interior painting prep for heritage homes
Even the finest quality paint cannot deliver lasting results if the preparation is not right. This is especially true in Melbourne’s iconic Victorian and Edwardian homes, where original plasterwork, ornate cornices, and aged timber trims demand a more considered approach than a standard modern interior. Standard prep steps like cleaning, filling, sanding, priming, and masking form the backbone of any professional job. But applying them correctly in a heritage context requires knowledge, patience, and the right materials. This guide walks you through every stage so you achieve a refined, lasting finish that respects the character of your home.
Table of Contents
- What you need before you start
- Step-by-step guide to prepping your interior walls
- Heritage home considerations: Victorian and Edwardian interiors
- Troubleshooting and common mistakes in interior painting prep
- The truth most guides miss about prepping Melbourne interiors
- How Sol Shine can support your project
- Frequently asked questions
Key Takeaways
| Point | Details |
|---|---|
| Preparation is crucial | Proper prep is the main factor in achieving a long-lasting paint finish, especially in heritage homes. |
| Use specialist methods | Victorian and Edwardian interiors need gentle cleaning and non-destructive techniques to preserve original features. |
| High-quality products matter | Premium repair and priming materials recommended by professionals help prevent common paint failures. |
| Avoid common mistakes | Skipping steps like cleaning or priming leads to poor results, so follow the guide closely for the best outcome. |
What you need before you start
Now that you understand why preparation matters, let’s make sure you have everything needed before lifting a paintbrush. Gathering the correct tools and materials before you start saves time, prevents unnecessary trips to the hardware store, and stops you making costly substitutions mid-job. In heritage homes particularly, using the wrong product at any stage can cause issues that are difficult or expensive to reverse.

Here is a clear breakdown of what you will need for a thorough interior prep in a Victorian or Edwardian home:
Essential tools and materials
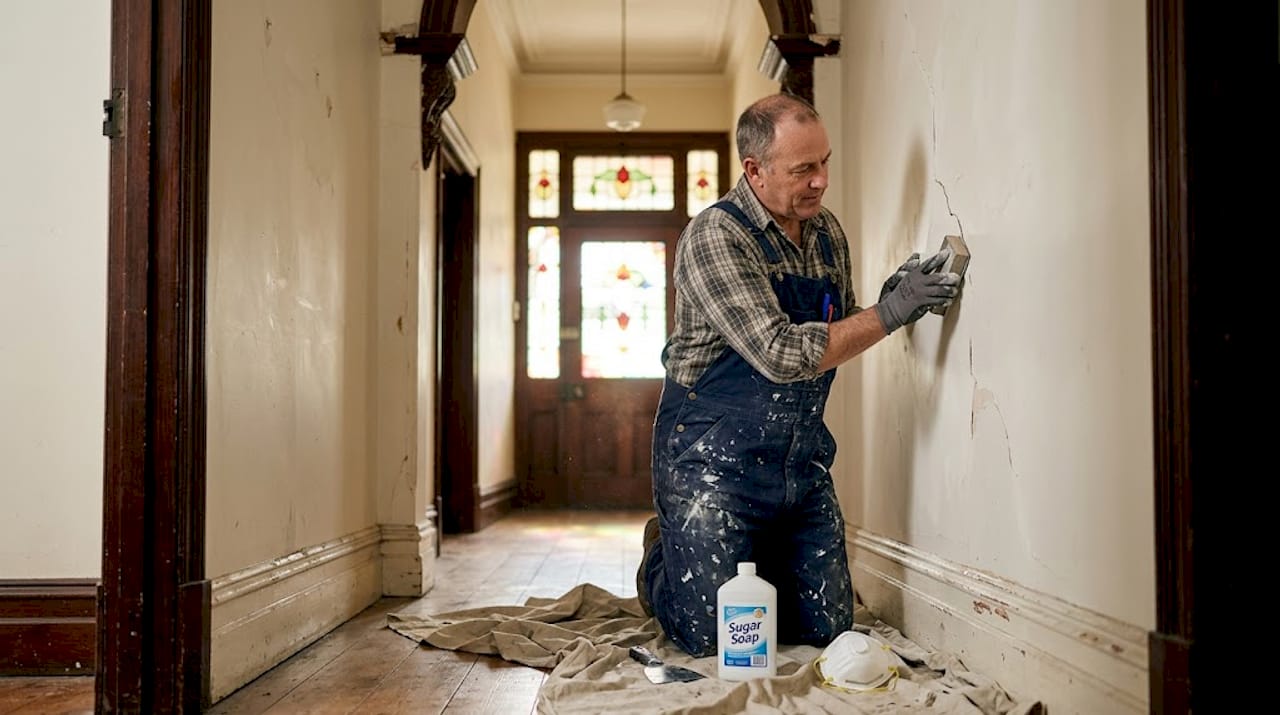
- Sugar soap and a bucket with warm water
- Sponges, soft cloths, and scrubbing pads (non-abrasive)
- Fine-grit sanding blocks (120 and 180 grit)
- Flexible filler and a putty knife
- Breathable primer suited to heritage plaster
- Stain-blocking primer for water or smoke marks
- Quality masking tape and plastic sheeting
- Drop sheets to protect floors and furniture
- Dust masks, safety glasses, and gloves
- A good-quality paintbrush and roller set
Premium products matter significantly here. For most interior wall surfaces, Melbourne painters commonly reach for Dulux 1Step Prep primer as a reliable all-in-one solution. Where stubborn stains are present, the Dulux Precision High Opacity Stain Blocker is the recommended choice before applying a topcoat like Dulux Wash & Wear. These products are specifically formulated to work with plaster and gyprock surfaces, delivering superior adhesion and a smooth, consistent base.
| Tool or material | Purpose | Heritage note |
|---|---|---|
| Sugar soap | Cleans grease and grime from walls | Safe for aged plaster surfaces |
| Flexible filler | Fills cracks and imperfections | Allows for natural wall movement |
| Breathable primer | Seals and prepares the surface | Essential for heritage plasterwork |
| Stain blocker | Covers water stains and discolouration | Prevents bleed-through under topcoat |
| Sanding blocks | Smooths filled areas and surfaces | Use fine grit only on heritage walls |
| Masking tape | Protects trims, cornices, and edges | Apply carefully around ornate features |
For the best outcome, review your painting workflow essentials before you begin, so every stage connects logically from start to finish.
Pro Tip: Before purchasing materials, walk through each room and assess the wall condition in natural daylight. Look for hairline cracks, water staining, flaking paint, or areas where old filler has shrunk back. This simple audit means you buy exactly what you need and avoids the frustration of running short halfway through.
Step-by-step guide to prepping your interior walls
With your kit ready, here is how to prep your walls for a flawless professional finish. Following a structured sequence is critical. Rushing or reordering these steps is one of the most common reasons DIY projects fall short of expectations.
-
Clear and protect the room. Move furniture to the centre of the room and cover it with drop sheets. Remove power point covers, light switches, and picture hooks. Lay drop sheets across the floor, overlapping at joins to catch drips and dust.
-
Clean the walls with sugar soap. Mix sugar soap with warm water according to the product instructions and wash every wall surface thoroughly. Work from the top down using a sponge or soft cloth. Rinse with clean water and allow the walls to dry completely before proceeding. This step removes grease, dust, and residue that would otherwise prevent paint adhesion.
-
Repair cracks and holes. Using a flexible filler and putty knife, fill all visible cracks, nail holes, and imperfections. In heritage plaster, hairline cracks are common, particularly around door frames and cornices where the building settles. Apply filler slightly proud of the surface to allow for shrinkage, then let it cure fully.
-
Sand all repaired areas. Once the filler is dry, sand back with a 120-grit sanding block until the surface is flush, then follow up with 180-grit for a smooth finish. Lightly sand the surrounding wall area to feather the edges. Wipe away all dust with a damp cloth.
-
Prime repaired areas and stains. Apply primer to all filled spots, bare plaster areas, and any stains. Standard prep steps confirm that priming repaired and stained areas is non-negotiable for a consistent finish. A stain-blocking primer on discoloured patches prevents marks bleeding through the topcoat.
-
Mask edges and features. Apply quality masking tape along skirting boards, cornices, door frames, and window reveals. In Victorian and Edwardian homes with ornate mouldings, take extra time here. Rushing this step causes paint bleed onto heritage timber trims that are difficult to touch up cleanly.
Statistic: Studies within the painting industry consistently show that a significant proportion of DIY interior repaints fail prematurely due to skipped cleaning or priming steps. Skipping either one dramatically reduces how well the paint bonds to the surface.
Pro Tip: For large heritage homes with multiple rooms, prep one room at a time rather than attempting to prep the entire house at once. This keeps each room’s prep fresh and prevents dust from one area contaminating a surface you have already primed in another.
For a full overview of the interior painting process from prep through to final coat, including what to expect at each stage, it helps to understand the complete sequence before starting.
Heritage home considerations: Victorian and Edwardian interiors
Standard prep works for many homes, but Melbourne’s Victorian and Edwardian interiors demand specialised care. The materials used in these properties are fundamentally different from modern construction, and treating them the same way is a mistake that can cause irreversible damage.
Original lime plaster, for instance, is softer and more breathable than modern gyprock. It also moves with seasonal temperature and humidity changes, meaning rigid fillers or non-breathable primers can crack and peel within a single year. Ornate cornices and ceiling roses are often irreplaceable, so aggressive sanding or stripping is completely off the table.
Unique issues found in heritage interiors include:
- Hairline plaster cracks caused by decades of building movement
- Multiple layers of old paint, sometimes including lead paint in pre-1970s homes
- Delicate cornices, ceiling roses, and dado rails that cannot be sanded aggressively
- Moisture-related damage behind walls from old plumbing or roof leaks
- Discolouration from decades of coal fires, tobacco, or water ingress
Critical note: Heritage prep avoids destructive methods such as high-pressure washing and sandblasting on interior surfaces. Non-destructive stripping and breathable primer systems must be used to preserve the integrity of original plasterwork and decorative features.
The good news is that interior repainting in heritage homes rarely requires council permits unlike exterior work under the Victorian Heritage Overlay. You can proceed with prep and painting without navigating council approval in most cases, which simplifies the project significantly.
| Method | Modern approach | Heritage-friendly approach |
|---|---|---|
| Wall cleaning | Strong detergent with scrubbing | Gentle sugar soap, soft cloths only |
| Crack filling | Standard rigid filler | Flexible, breathable heritage filler |
| Surface stripping | Chemical stripper or heat gun | Non-destructive, minimal interference |
| Sanding | Heavy sanding to key the surface | Fine-grit, light sanding only |
| Priming | Standard acrylic primer | Breathable lime-compatible primer |
Choosing the right products for paint for heritage homes makes a genuine difference to the longevity of your project. Using breathable systems allows moisture to pass through the wall rather than becoming trapped beneath a sealed layer, which is one of the leading causes of paint failure in older homes.
For properties where preserving historical interiors is the priority, working with a restorer who understands lime plaster and heritage materials is far more reliable than applying a generic prep approach. Proper surface preparation for quality repainting in these homes pays dividends for many years after the job is complete.
Troubleshooting and common mistakes in interior painting prep
Even with the right steps, small missteps can undermine your hard work. Here is what to look out for before and during your prep so you can course-correct quickly.
Common mistakes made by DIY painters and how to fix them:
- Skipping the wall wash. Many homeowners move straight to filling and sanding without cleaning first. Paint applied over a dusty or greasy surface will not bond correctly and is likely to peel within months. Always clean before any other prep step.
- Using the wrong filler. Standard rigid filler in heritage plaster cracks will shrink, pop out, or crack again as the wall moves. Use a flexible product rated for plaster repair.
- Insufficient sanding. Filled areas that are not sanded back flush create visible bumps and ridges under the finished paint. Take time to sand properly and feel the surface with your hand before priming.
- Skipping primer on repaired spots. Bare filler absorbs the first coat of paint differently from the surrounding wall, creating dull, patchy areas called flashing. Prime every repaired spot and any stains before the topcoat.
- Rushing the drying time. Applying paint or primer over surfaces that have not fully dried causes bubbling, poor adhesion, and uneven finish. Follow product instructions and allow adequate drying time between every stage.
- Ignoring lead paint risk. In homes built before 1970, existing paint may contain lead. Sanding lead paint without the right precautions is a health hazard. If you are unsure, test before sanding or consult a professional.
Proper wall prep steps confirm that cleaning, filling, sanding, priming, and masking must all be completed before a topcoat is applied. Skipping any single step introduces risk to the final result.
Expert note: The one prep step that professionals never skip is cleaning the walls before anything else. No matter how fresh the paint looks or how clean the room appears, residue and oils on the surface will compromise adhesion. It takes little time but prevents significant problems.
When you address stains before painting, reach for a dedicated stain-blocking primer rather than applying extra coats of topcoat. Additional topcoat over an unsealed stain does not solve the problem. It only temporarily hides it, and the stain bleeds through within weeks. For advice on achieving long-lasting paint prep that holds up for a decade or more, understanding these failure points is the first step.
The truth most guides miss about prepping Melbourne interiors
You now have the essentials, but what really sets apart a flawless heritage finish in a Melbourne home? Here is what most professionals wish homeowners understood before they start.
Generic prep checklists are written for the average wall in the average home. Melbourne’s Victorian and Edwardian properties are not average. They were built using materials and methods that predate modern construction standards, and they carry over a century of repairs, renovations, and paint layers accumulated by previous owners. What looks like a simple hairline crack may be the surface expression of a deeper structural movement. What appears to be an even wall may have three incompatible paint systems layered beneath the surface.
The real lesson is that prep in a heritage home is partly investigative work. You are not just cleaning and filling. You are reading the wall, understanding what has happened to it over decades, and making decisions that will affect how the next layer of paint behaves for years to come.
Modern efficiency is valuable, but it cannot override careful observation in these homes. Choosing sustainable painting choices and breathable systems is not just about environmental responsibility. It is about working with the building’s natural behaviour rather than against it. Heritage homes reward patience and penalise shortcuts every single time.
How Sol Shine can support your project
If you want professional results for your interior project, expert support can make all the difference.

Sol Shine works with Melbourne homeowners on large-scale interior painting and heritage restoration projects from Kew to Brighton and across the inner east and bayside suburbs. Our team understands the specific demands of Victorian and Edwardian interiors, from reading the condition of original plasterwork to selecting the right breathable primer system for your walls. Thorough prep is built into every project we manage, saving you the time, cost, and frustration of redoing work that was not done right the first time. For projects involving interior painting services or requiring specialist heritage painting expertise, we invite you to get in touch and discuss your home with our team directly.
Frequently asked questions
Do I need council approval for interior painting in a heritage home?
Generally, interior painting in Victorian and Edwardian homes in Melbourne does not require council permits, as interior repainting rarely falls under the Victorian Heritage Overlay unlike exterior work. Always confirm with your local council if you are uncertain about your specific property.
What cleaner should I use before painting interior walls?
Sugar soap is the preferred cleaner for interior walls before painting, as it effectively removes grease, dust, and residue without damaging plaster surfaces. Rinse thoroughly with clean water and allow the wall to dry fully before proceeding.
Can I use a high-pressure washer to prepare heritage interior walls?
No. High-pressure washing and sandblasting must be avoided on heritage interior surfaces entirely. Always use gentle, non-destructive cleaning methods to protect original plasterwork and decorative features.
What’s the best filler for cracks in heritage plaster walls?
A flexible, breathable filler is the right choice for heritage plaster, as it accommodates the natural movement of older walls without cracking or popping out over time. Avoid standard rigid fillers, which are better suited to modern gyprock surfaces.
How do I repair stains before painting interior walls?
Apply a dedicated stain-blocking primer such as Dulux Precision High Opacity Stain Blocker directly over the stain before painting. This prevents the stain from bleeding through the topcoat, which extra coats of paint alone cannot reliably achieve.


