
TL;DR:
- Proper surface preparation and moisture testing are essential for lasting epoxy floors, especially in Australian conditions. Skipping critical steps like grinding, primer, or correct timing often leads to peeling, bubbling, or failure within months. Working within recommended temperature and humidity ranges, and applying each coat precisely, significantly extends the floor’s durability and appearance.
Epoxy is one of the most durable and attractive finishes you can apply to a concrete floor, but it punishes shortcuts. Many homeowners attempt a DIY epoxy coating only to find peeling, bubbling, or hazy patches within months of application. Following the correct epoxy coating application steps from the very beginning is what separates a floor that lasts a decade from one that fails before the first winter. This guide walks you through every stage of the process, from tools and preparation through to curing, with practical advice tailored to Australian conditions.
Table of Contents
- Key takeaways
- What you need before the first coat
- Surface preparation and repair
- Mixing and applying primer and base coats
- Applying topcoats and managing cure time
- Troubleshooting and common mistakes
- What I have learned about epoxy after years in the trade
- Professional epoxy and painting services in Melbourne
- FAQ
Key takeaways
| Point | Details |
|---|---|
| Moisture testing is non-negotiable | Test concrete moisture before starting to prevent adhesion failure and delamination. |
| Surface prep determines longevity | Mechanical grinding and proper crack repair are the most critical factors in a lasting result. |
| Pot life is strict | Mixed epoxy must be applied within 30 to 60 minutes or it will begin to cure in the bucket. |
| Primer prevents most failures | Skipping the primer coat is the single most common cause of peeling and bubbling. |
| Curing takes longer than drying | Full chemical resistance cure requires 7 to 14 days, even when the floor feels dry underfoot. |
What you need before the first coat
Getting the tools and conditions right before you open a single tin is the most overlooked part of any epoxy application guide. Arriving under-equipped or in the wrong weather is a guaranteed path to failure.
Tools and materials checklist:
- Angle grinder with diamond cup wheel or floor grinder (for surface profiling)
- Vacuum and stiff-bristle broom
- Concrete degreaser and mop
- Moisture metre or in-situ RH probe
- Epoxy primer (two-part)
- Epoxy base coat (two-part, Part A and Part B)
- Polyurea joint filler and epoxy-compatible crack filler
- Measuring jugs or a digital scale
- Low-speed drill with paddle mixer
- Roller frame, roller covers rated for epoxy (short nap, 6mm to 10mm), and extension poles
- Cut-in brush for edges
- Notched squeegee for self-levelling products
- Decorative vinyl flakes (optional)
- Clear polyurethane or epoxy topcoat
- Disposable gloves, safety glasses, and a respirator rated for organic vapours
| Tool | Purpose |
|---|---|
| Diamond grinder | Creates surface profile for adhesion |
| Low-speed drill mixer | Ensures thorough mixing without aeration |
| Short-nap roller | Delivers even coat without leaving fibres |
| Notched squeegee | Spreads self-levelling epoxy at correct depth |
| RH probe | Measures internal concrete moisture |
Temperature and humidity matter enormously. Ambient conditions of 50 to 90°F and humidity below 75% are the accepted safe range for epoxy application. In Melbourne, this typically means avoiding the hottest weeks of summer and the coldest mornings of winter.
The ASTM F2170 standard recommends a relative humidity reading of no more than 75% within the concrete slab itself, not just the ambient air. Use an in-situ RH probe rather than relying on surface feel alone.
Pro Tip: Apply epoxy in the late afternoon when slab temperatures are stable or cooling. Morning applications risk the concrete still being cooler than the dew point, which causes outgassing and air bubbles trapped under the coating.
Surface preparation and repair
This is where the job is won or lost. No amount of high-quality product will compensate for a surface that is not properly prepared. The epoxy coating application steps begin here, long before any resin is mixed.
Surface preparation checklist:
- [ ] Remove all oil, grease, paint, and adhesive residue using a degreaser and mechanical scrubbing
- [ ] Grind the entire slab with a diamond cup wheel to open the concrete pores and achieve a surface profile equivalent to 80-grit sandpaper
- [ ] Vacuum thoroughly, then wipe down with a clean damp cloth to remove all dust
- [ ] Inspect for cracks, spalls, and joint edges
- [ ] Fill cracks with an epoxy-compatible filler or polyurea joint filler
- [ ] Allow filler to cure fully before continuing
- [ ] Re-grind any high spots or filler mounds flush with the slab
- [ ] Confirm moisture readings are within acceptable limits
Mechanical grinding creates what professionals call a concrete surface profile (CSP). Without it, the epoxy sits on top of a smooth, closed surface with nothing to bond to. Many peel failures trace back to inadequate grinding rather than a bad product.
When it comes to cracks, the filler you choose matters as much as the technique. Standard crack fillers are incompatible with epoxy and will cause peeling or coating failure at the repaired area. Use only epoxy-compatible fillers or flexible polyurea products designed to accommodate concrete movement.
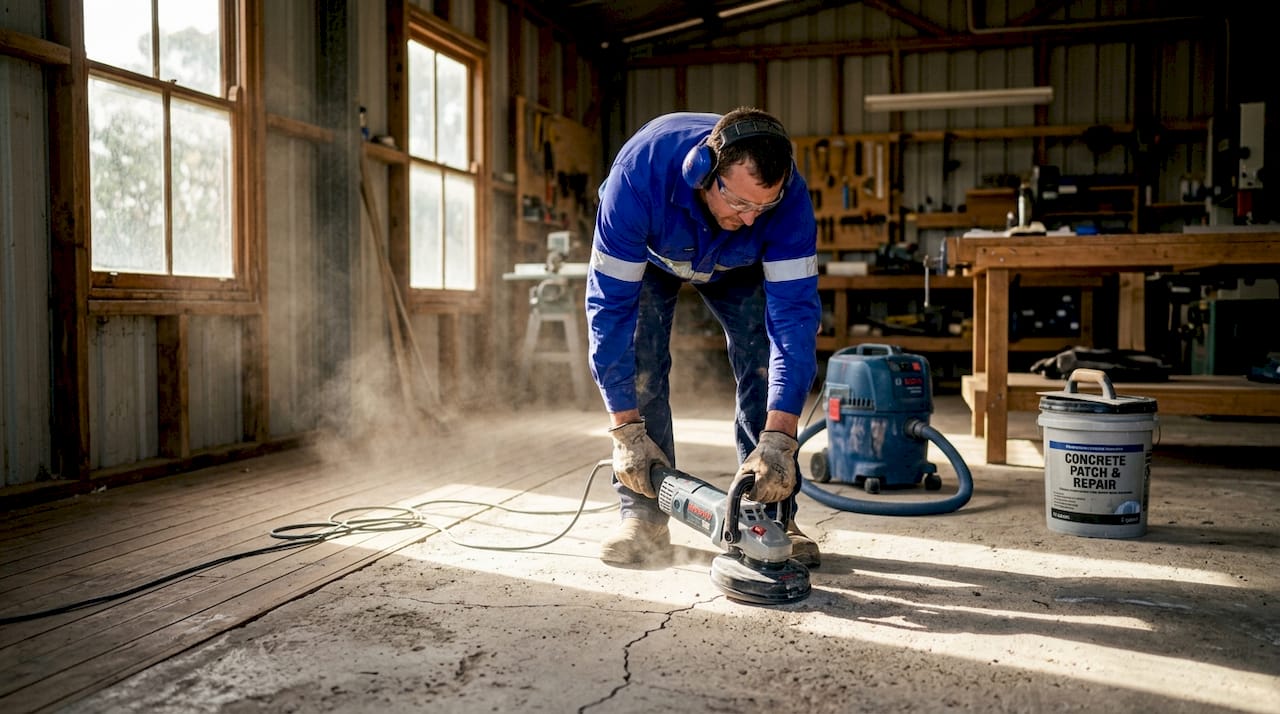
Expansion joints are a special case. Do not fill them with rigid filler. These joints are designed to allow movement, and bridging them with a hard material leads to cracking as the slab flexes through seasonal temperature changes. Treat expansion joints with a flexible polyurea sealant and leave them free to move beneath any coating.
Pro Tip: After grinding, pour a small amount of water onto the surface. If it soaks in within a few seconds, the surface is open and ready. If it beads, you have surface contamination or a sealer still present. Grind again.
Mixing and applying primer and base coats
This is the stage where most DIYers feel the most pressure, and rightly so. Epoxy is a two-part chemical system and it will not forgive poor technique. Working through the following steps in order gives you the best chance of a smooth, professional result.
Step-by-step mixing and application process:
- Measure Part A and Part B precisely. Use your product’s specified ratio (usually 2:1 or 3:1 by volume). An inaccurate ratio means incomplete curing and a soft, tacky floor.
- Pour Part B into Part A (never the reverse) and mix with a low-speed paddle drill for two to three minutes, scraping the sides and base of the bucket.
- Check for streaks. The mixed product should be uniform in colour with no swirls or streaks before you begin applying.
- Start with the primer coat. Skipping the primer coat leads to adhesion failure because primers seal the concrete, prevent outgassing, and create a chemically bonded base for subsequent coats.
- Cut in the edges with a brush before rolling the field. Work in sections of about two to three square metres at a time.
- Roll in one direction first, then back-roll perpendicular to remove roller marks and ensure even penetration.
- Allow the primer to cure to the manufacturer’s specified recoat window (typically four to eight hours depending on temperature).
- Apply the base coat using the same technique. Work at a consistent pace to maintain a wet edge.
- Broadcast decorative flakes (if using) immediately after rolling each section while the coat is still wet. Broadcast from waist height for even distribution.
- Allow full cure before walking on the surface or proceeding to the topcoat.
Pot life is typically 30 to 60 minutes from the moment Part A and Part B are combined. Once the mix starts to thicken or feel warm in the bucket, stop using it. Applying thickened epoxy creates uneven texture and poor adhesion.
Lap marks are a common issue on larger floors. The solution is to work in consistent strip widths that match your roller width, move quickly, and never go back and touch a section that has started to gel. Having a second person manage flake broadcasting or supply fresh mixes dramatically reduces lap mark risk.
Pro Tip: Mix only as much material as you can apply in 30 minutes. If you are working alone on a floor larger than 20 square metres, consider working in clearly defined zones so each batch is applied and finished before mixing the next.
For heritage properties with period home epoxy specifics, surface profiles and moisture conditions inside older concrete slabs often require additional preparation steps.
Applying topcoats and managing cure time
The topcoat is the layer your floor lives on. It protects the base coat and flakes from abrasion, UV exposure, and chemical spills. Getting it right is the final stage in any thorough epoxy floor coating process.
Once the base coat has cured to the recoat window, lightly abrade the surface with a 120-grit screen pad attached to a floor buffer. This removes any loose flakes, rough edges, or surface contamination. Vacuum and tack wipe before applying the topcoat.
Apply the topcoat using the same cut-in-then-roll method as the base coat. Most topcoats require two layers for adequate protection, with each layer applied within the product’s recoat window. Coverage rates typically fall between eight and twelve square metres per litre depending on product and surface texture.
Common curing issues to watch for:
- Amine blush. A whitish, waxy film that forms on the surface when humidity exceeds 75% during cure or when unvented heaters are used inside the space. Amine blush causes adhesion loss between coats and must be removed by mechanical abrasion before recoating. It cannot be wiped off.
- Soft or tacky surface. Usually caused by incorrect mix ratios or application below minimum temperature. Allow additional cure time and check conditions.
- Surface bubbles. Caused by outgassing from the concrete when the slab temperature is below the dew point. The concrete surface must stay at least 5°F above the dew point throughout application and initial cure.
A DIY epoxy garage floor project requires 15 to 20 hours of hands-on labour spread across three to four active working days, with a full chemical resistance cure of seven to fourteen days. You can walk on the floor within 24 hours and drive on it within 72 hours in most conditions, but avoid chemical spills and heavy rolling loads until the full cure is complete.
Pro Tip: Check ambient temperature and humidity at the start of each working session, not just once in the morning. Conditions inside a garage or enclosed space can shift significantly through the day, especially in Melbourne’s changeable spring and autumn weather.
Troubleshooting and common mistakes
Even with careful preparation, problems can appear. Understanding what went wrong and how to address it early saves a costly re-do.
| Mistake | Consequence | Solution |
|---|---|---|
| Skipping moisture testing | Delamination and bubbling within weeks | Test before application; delay if RH exceeds 75% |
| Using standard crack filler | Peeling at repaired areas | Use only epoxy-compatible or polyurea fillers |
| Skipping the primer | Widespread peeling and bubbles | Always apply a two-part epoxy primer first |
| Applying in high humidity | Amine blush and inter-coat adhesion failure | Work within the recommended humidity range |
| Mixing too large a batch | Thickened product, lap marks, waste | Mix smaller batches; plan sections in advance |
| Recoating outside the window | Delamination between coats | Follow the manufacturer’s minimum and maximum recoat times |
Beyond the table above, a few maintenance habits extend the life of your finished floor considerably. Sweep regularly to prevent abrasive grit from scratching the topcoat. Wipe up oil and chemical spills promptly. Avoid dragging sharp metal objects across the surface. A well-maintained epoxy floor in a Melbourne home can realistically last 10 to 15 years before needing attention.
The epoxy coating benefits for heritage homes are particularly relevant for period properties where concrete floors in rear additions or garages are being brought up to a modern standard without disrupting the home’s character.
What I have learned about epoxy after years in the trade
I have seen a lot of epoxy floors go wrong, and almost every failure traces back to the same two things: moisture they did not test for and prep they skipped because the surface “looked fine.”
The biggest myth in DIY epoxy work is that the product does the heavy lifting. It does not. Epoxy is only as good as the surface beneath it. I have watched homeowners spend good money on premium two-part systems only to have them fail within a year because the grinder never touched the floor. In my experience, spending 60% of your total project time on preparation is not excessive. It is the minimum required for a result worth having.
For first-timers, I always recommend starting with a smaller space such as a laundry or store room rather than tackling the full garage floor. The learning curve on maintaining a wet edge, managing pot life, and broadcasting flakes evenly is real. Getting that experience on a lower-stakes surface means your main floor benefits from your competence rather than your mistakes.
Temperature monitoring is the other thing most guides underplay. In Melbourne particularly, a day that starts at 12°C can push to 28°C by early afternoon. That swing affects pot life, recoat timing, and curing behaviour all at once. Monitoring conditions throughout the day, not just when you start, is what separates a controlled result from a stressful guessing game.
— Jarrad
Professional epoxy and painting services in Melbourne
If you have worked through this guide and decided the project scope or conditions are more than you want to manage alone, Sol Shine is here to help. Based in Melbourne and servicing suburbs across the inner east and bayside including Kew, Hawthorn, Camberwell, Brighton, and Malvern, Sol Shine offers professional interior painting and protective coating work for both period and contemporary homes.
Browse Sol Shine’s interior painting projects to see the standard of finish the team delivers, or explore the full interior painting services page for details on what is included. For surface preparation guidance that applies to both paint and epoxy, Sol Shine’s resources are worth bookmarking before your next project. Get in touch to discuss your flooring or painting needs directly.
FAQ
What are the basic epoxy coating application steps?
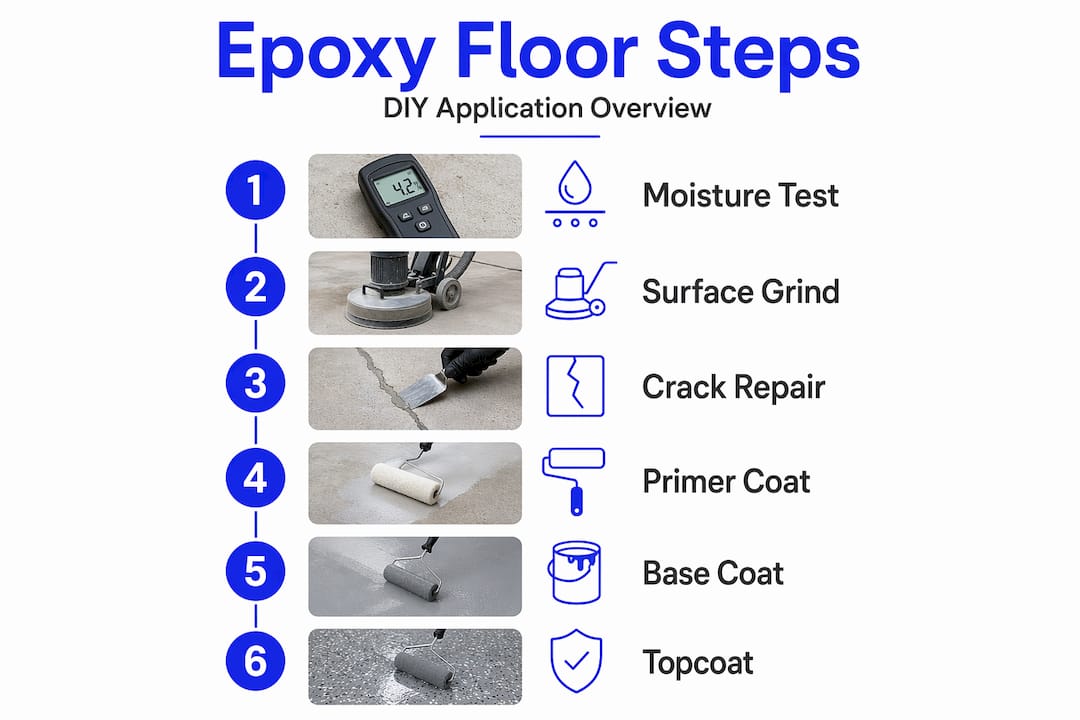
The core steps are moisture testing, surface grinding, crack repair, primer application, base coat application, topcoat application, and full curing. Each stage builds on the previous one, and skipping any step risks coating failure.
How long does epoxy flooring take to cure completely?
A DIY epoxy floor typically requires 7 to 14 days for full chemical resistance cure. Light foot traffic is usually safe within 24 hours, but avoid heavy loads and chemical exposure until curing is complete.
Why is my epoxy floor peeling after application?
Peeling most commonly results from insufficient surface preparation, skipping the primer coat, or excess moisture in the concrete. Moisture above 75% RH within the slab is one of the leading causes of adhesion failure.
What is amine blush and how do I fix it?
Amine blush is a whitish, waxy film that forms on curing epoxy when humidity is too high or unvented heaters are used nearby. Once present, it can only be removed by mechanical abrasion before the next coat is applied.
Can I apply epoxy on a cold or humid day in Melbourne?
Applying epoxy outside the recommended temperature range of 50 to 90°F or above 75% humidity creates serious risk of amine blush, outgassing, and delamination. Wait for stable, moderate conditions before starting any stage of the process.


