
TL;DR:
- Proper surface preparation, including grinding and moisture testing, is crucial for years-long epoxy driveway coatings.
- Applying the coating in the late afternoon and working within pot life ensures a smooth, durable finish that resists peeling.
- Regular maintenance and re-coating every five to seven years prolongs the lifespan of an epoxy driveway system.
Cracked, stained, or flaking driveway surfaces are more than an eyesore. They chip away at kerb appeal and let moisture work deeper into the concrete with every Melbourne winter. Following the correct driveway epoxy coating steps from the very start is what separates a finish that lasts a decade from one that peels within months. This guide walks you through every stage: gathering materials, preparing the slab, mixing and applying the epoxy basecoat, broadcasting decorative flakes, sealing with a UV-stable topcoat, and caring for the surface through the critical first week.
Table of Contents
- Key takeaways
- What you need before you start
- Site preparation: the foundation of every lasting finish
- Mixing and applying the epoxy basecoat
- Sealing with a UV-stable topcoat
- Common mistakes and how to avoid them
- What experience has taught me about epoxy driveways
- Professional driveway coatings by Sol Shine
- FAQ
Key takeaways
| Point | Details |
|---|---|
| Preparation is 80% of the work | Grinding, degreasing, and moisture testing directly determine whether the coating bonds and holds. |
| Moisture testing is non-negotiable | Use a plastic sheet test or RH probe before applying any product to avoid bubbling and peeling. |
| Match product to exposure | Use a 100% solids epoxy basecoat with a UV-stable polyaspartic topcoat for outdoor driveways. |
| Respect pot life and cure times | Mix only what you can apply in 10–30 minutes; allow 72 hours minimum before driving on the surface. |
| Late-afternoon application reduces defects | A cooling slab produces far fewer air bubbles than morning application on a warming concrete surface. |
What you need before you start
Getting the right gear together before you open a single tin saves you from stopping mid-job and letting mixed epoxy go to waste. Below is a clear breakdown of what you need across three categories.
Safety gear
- P2 respirator or half-face respirator with organic vapour cartridges
- Chemical-resistant nitrile gloves
- Safety glasses or goggles
- Knee pads for extended floor work
- Non-slip work boots with covered toes
Surface preparation tools and cleaning supplies
- Angle grinder fitted with a diamond cup wheel, or a hired floor grinder for larger slabs
- Industrial vacuum with HEPA filter
- Stiff-bristle broom
- Concrete degreaser and oil remover
- Crack filler and patching compound
- Moisture barrier primer (essential if any moisture is detected)
Epoxy materials and application tools
| Item | Purpose |
|---|---|
| 100% solids epoxy basecoat | Primary bonding layer over the concrete |
| Decorative flakes (vinyl chips) | Texture, traction, and aesthetic finish |
| UV-stable polyaspartic topcoat | Protects epoxy from sun yellowing and chemical damage |
| 9mm nap roller with extension handle | Even basecoat distribution |
| Synthetic brush | Cutting in along edges and corners |
| Mixing paddle and drill | Accurate two-part mixing |
| Squeegee or notched spreader | Controlling basecoat thickness |
Pro Tip: Buy roughly 10–15% more product than your area calculation suggests. Driveways are rarely perfect rectangles, and thin spots on the first coat are much harder to fix than having a little extra on hand.
Site preparation: the foundation of every lasting finish
This is where mechanical grinding and thorough prep separate successful coatings from expensive failures. Poor preparation is the single most common reason epoxy peels. Do not rush any of the steps below.
Step 1: Inspect the slab thoroughly. Walk the entire driveway and mark any cracks, oil stains, spalling, or areas where a previous sealer may have been applied. Drag a coin across the surface: if it slides smoothly with little resistance, a sealer is likely present and will need to be ground back before any epoxy will bond.
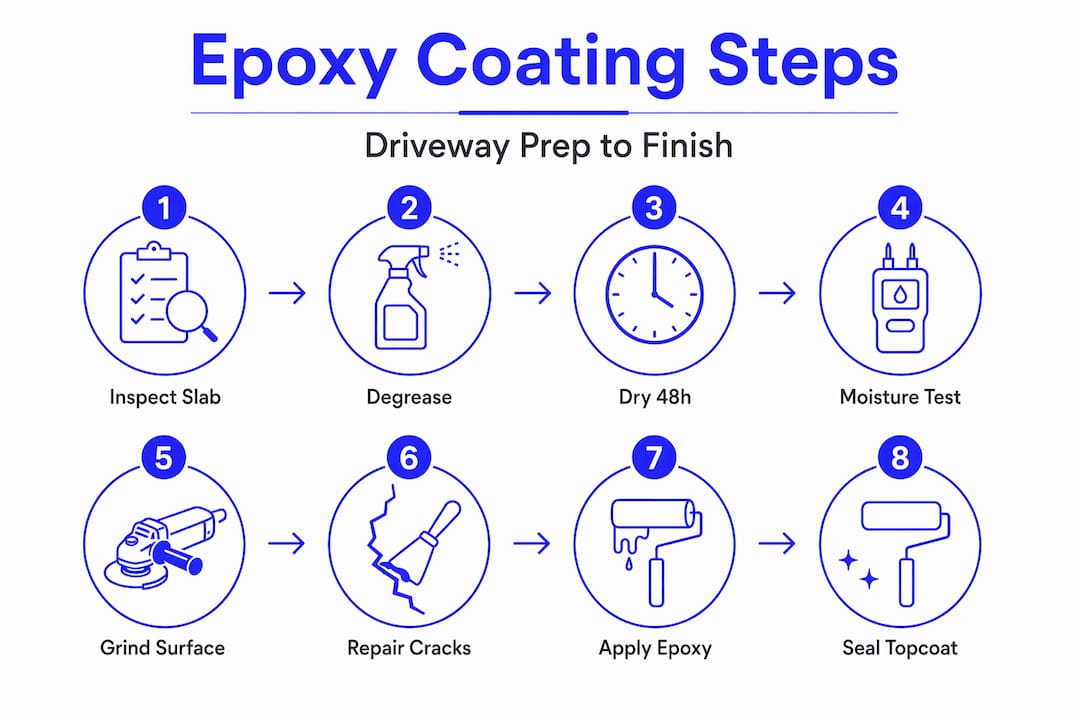
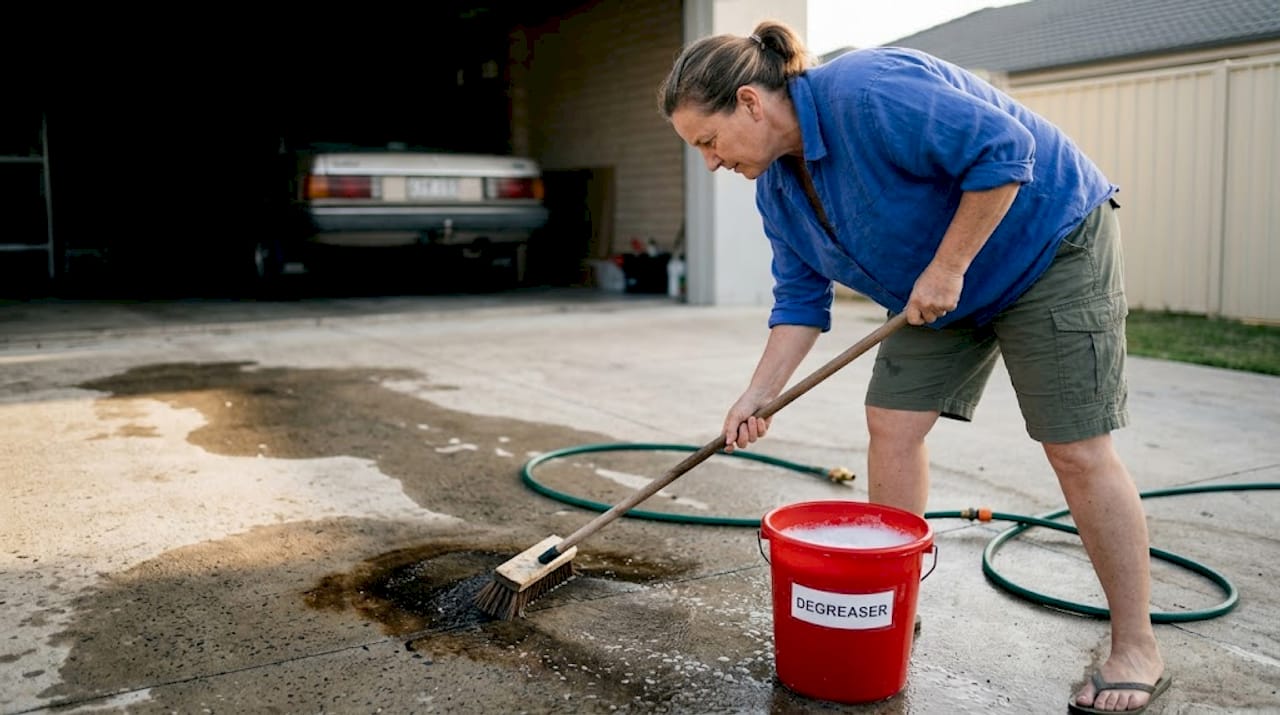
Step 2: Deep clean and degrease. Apply a concrete degreaser to all oil-contaminated areas and scrub with a stiff brush. Rinse fully and allow the slab to dry. Any oil or grease left behind will create weak spots where the coating lifts.
Step 3: Allow a 48-hour dry time. After washing, the slab needs 48 hours of drying time before you proceed. Applying epoxy over a damp surface is one of the most common DIY errors.
Step 4: Test for moisture. Tape a 600mm x 600mm sheet of plastic film firmly to the slab surface and leave it for 24–48 hours. Condensation under the film confirms moisture movement through the concrete. ASTM D4263 plastic sheet testing is a qualitative screen, and for more precise data on high-risk slabs, an RH probe test (ASTM F2170) delivers warranty-grade readings. If moisture is detected, apply a moisture-barrier primer before proceeding. Moisture is the silent cause of most epoxy failures, including bubbling, peeling, and delamination.
Step 5: Mechanical grinding. Use a diamond cup wheel grinder to open the surface profile of the concrete. This creates a texture that allows the epoxy to grip mechanically rather than just sitting on top. For a standard driveway, aim for a CSP (Concrete Surface Profile) of 2 to 3. Vacuum all dust thoroughly when done.
Step 6: Repair cracks and spalls. Fill cracks with a polyurethane or epoxy crack filler and allow it to cure fully per the manufacturer’s instructions. Feather the repair flush with the slab surface so the roller will pass over it without lifting.
Pro Tip: Apply a moisture-seal primer even when the plastic sheet test comes back clear if your slab is on-grade (directly on soil) and Melbourne winters are involved. It is inexpensive insurance against a result you cannot reverse.
Mixing and applying the epoxy basecoat
With a prepared slab, you are ready for the most time-sensitive part of the process. Two-part epoxies have a pot life of roughly 10 to 30 minutes depending on temperature, which means you need to work with focus and consistency.
-
Check weather conditions. Apply epoxy when the concrete surface temperature sits between 10°C and 32°C and relative humidity is below 85%. Apply in late afternoon as the slab cools rather than in the morning when it is warming up. A warming slab pushes air through the coating and creates bubbles.
-
Mix only what you can apply in one go. Pour Part A and Part B into a clean bucket at the exact ratio specified by the product (usually 2:1 or 3:1 by volume). Mix with a paddle and drill for two full minutes, scraping the sides and base of the bucket. Overmixing or loading too much product shortens working time and compromises the final cure. For larger driveways, mix multiple smaller batches rather than one large one.
-
Observe the induction time. After mixing, let the product rest for 10 minutes before applying. This activates the chemistry and improves flow and adhesion. Skipping induction time is a common oversight that reduces performance.
-
Cut in edges and detail areas. Use a synthetic brush to coat the perimeter, around posts, and into corners. Work about 100–150mm in from the edge so the roller has a clean wet edge to roll into.
-
Roll the basecoat. Pour the mixed epoxy into a roller tray and apply with a 9mm nap roller using consistent, overlapping passes. Work in 1–1.5 metre sections and maintain a wet edge throughout to avoid lap marks.
-
Broadcast decorative flakes. While the basecoat is still wet, toss vinyl colour flakes into the surface from a height of about 600mm using a sweeping, even motion. Flakes must go down within 20–30 minutes of basecoat application. Timing errors here cause adhesion failure where flakes sit proud rather than embed. Once the basecoat cures, scrape off any raised flakes with a floor scraper and vacuum the surface clean before proceeding to the topcoat.
Pro Tip: For full-broadcast coverage (flakes covering the entire surface), apply more product than feels comfortable. Thin coverage results in a patchy, uneven look after the topcoat goes down.
Sealing with a UV-stable topcoat
Epoxy basecoat alone is not sufficient for an outdoor driveway. Epoxy without a UV-stable topcoat will yellow and amber within months of sun exposure, degrading both appearance and performance. A polyaspartic topcoat addresses this directly, providing UV stability, chemical resistance, and a hard, traffic-ready surface.
- Mix the polyaspartic topcoat to the manufacturer’s specified ratio, again observing a brief induction period.
- If you want anti-slip texture (highly recommended for driveways), add the specified quantity of fine aluminium oxide or silica grit to the mixed topcoat and stir thoroughly before applying.
- Pour the topcoat onto the cured and vacuumed flake surface, spread with a squeegee, and back-roll immediately with a clean 9mm nap roller to level and remove lines.
- Apply in sections and maintain a wet edge, just as you did with the basecoat.
Cure times to respect:
- Foot traffic: minimum 24 hours
- Vehicle traffic: minimum 72 hours before driving on the surface
- Hot tyre resistance: up to 7 full days for some products
Under-curing leads to hot tyre pickup, where the tyre bonds lightly to the surface and tears the coating on departure. This is essentially irreversible without recoating. A correctly applied epoxy and polyaspartic system can last 8 to 15 years with proper preparation and upkeep.
Pro Tip: During the first week after application, avoid dragging anything across the surface, placing rubber-backed mats down, or parking in the same spot every day. All three can leave permanent marks before the coating reaches full hardness.
For ongoing upkeep, review a driveway maintenance checklist that covers everything from cleaning schedules to recoat timing specific to Melbourne conditions.
Common mistakes and how to avoid them
Even with good intentions, several missteps can cause a fresh coating to fail within weeks. Here is what to watch for.
- Skipping or rushing prep. Insufficient grinding leaves a surface that is too smooth for mechanical bonding. If in doubt, grind again.
- Ignoring moisture. This is the most underestimated failure point. Even a slab that feels and looks dry can carry enough vapour to lift a coating. Always test.
- Mixing too much at once. Once the pot life is exceeded, the epoxy thickens and will not level or bond correctly. Mix in small batches and commit to a fast, organised workflow.
- Broadcasting flakes too late. Flakes pressed into partially cured epoxy sit high and create an uneven, rough surface that is difficult to fix.
- Driving on it too soon. Forty-eight hours may feel safe. For hot tyre resistance, it is not enough. Allow the full cure window.
When adhesion failure or bubbling appears after the coating has cured, the most likely culprits are moisture, insufficient grinding, or contamination. Strip the affected areas back to bare concrete, re-prepare thoroughly, and recoat. Patching over a failed coating rarely produces a lasting result.
If the affected area is large, or if the slab has significant structural issues, calling a professional coating specialist is a more reliable path than attempting a patch repair over a compromised system.
What experience has taught me about epoxy driveways
I’ve looked at a lot of epoxy driveway failures over the years, and almost every single one traces back to one of two things: insufficient grinding or moisture that was never tested for. Homeowners often spend their energy choosing flake colours and topcoat sheens, which is understandable. The result you can see is exciting. But the work that makes the result last is entirely invisible under the finished surface.
What I’ve also learned is that timing sensitivity catches people off guard. The pot life window feels generous until you are halfway through mixing your second batch and realise the first is starting to pull on the roller. Having a helper dedicated solely to mixing while you roll is not a luxury on a full driveway. It is a necessity.
My honest take on cheap epoxy coating products is this: the material cost difference between a low-grade kit and a quality 100% solids system with a proper polyaspartic topcoat is modest compared to the labour you put in. A reliable step-by-step epoxy guide combined with quality materials gives you a result worth the effort. A budget product applied over inadequate prep gives you something to sand back within two years.
Realistic expectations also matter. Even a perfect application on Melbourne’s climate-exposed concrete will show wear over time. Plan for a maintenance recoat of the topcoat every five to seven years, and the base system will outlast most other driveway resurfacing methods available to a homeowner.
— Jarrad
Professional driveway coatings by Sol Shine
For homeowners who want a premium result without the risk of a costly DIY misfire, Sol Shine brings the same rigour to exterior coatings as it does to heritage restoration. The team handles full surface preparation including mechanical grinding, moisture assessment, crack repair, and multi-coat application with quality-assured products. Every project is managed directly with the homeowner, with clear timelines and transparent communication throughout.
If your driveway is overdue for a proper coating, or if you are planning broader exterior upgrades to your Melbourne home, Sol Shine’s exterior painting and coating projects page shows the standard of finish you can expect. Get in touch to discuss your project and receive a detailed quote.
FAQ
What are the main driveway epoxy coating steps?
The core steps are: inspect and clean the slab, test and address moisture, mechanically grind the surface, repair cracks, apply a primer if needed, mix and roll the epoxy basecoat, broadcast decorative flakes, then seal with a UV-stable polyaspartic topcoat.
How long does epoxy take to cure on a driveway?
Foot traffic is generally safe after 24 hours, vehicle traffic after a minimum of 72 hours, and full hot-tyre resistance can require up to 7 days depending on the product and ambient temperature.
Do I need a topcoat over epoxy on an outdoor driveway?
Yes. Epoxy alone is UV-unstable and will yellow with sun exposure. A polyaspartic topcoat adds UV stability, chemical resistance, and a hard-wearing finish suited to outdoor conditions.
What causes epoxy to bubble or peel on concrete?
Bubbling and peeling are almost always caused by moisture vapour moving through the slab, insufficient surface grinding, or surface contamination such as oil that was not fully removed before coating.
How long does an epoxy driveway coating last?
A properly prepared and sealed epoxy and polyaspartic system can last between 8 and 15 years, depending on sun exposure, traffic load, and how well the surface is maintained over time.


